Provisioning Thread Legal
Requirements Before Starting
Provisioning Thread Legal
- Click Get Thread.
- Sign in using the Global Administrator login details for the Microsoft 365 tenant.
- You will be asked to accept permissions, click Accept.
- Fill out contact details and click Install.
- Continue to the next step while Thread is installing.
Setting up Mail flow rule
Log in to the Microsoft 365 Admin center portal https://admin.microsoft.com
In the left pane, click Exchange under the Admin section.
Click Mail flow.
Under the rules tab, click the + button and click Create a new rule.
The transport rule window will be displayed.
In the Name field, enter Thread Mail Flow.
For Apply this rule if, click The sender is external/internal and choose – Outside the organisation.
(In-house legal teams may want to skip this step, if they would like emails from other individuals within the organisation to be included in the mailflow).
Select the phrase and click 'Save'.
Under Except if… select ‘The sender... is this person’ and select the dedicated email address.
Click Next.
Setting up Thread Email Functionality
Once Thread is installed, log on to Thread using the Global Administrator details.
Click the Settings tab at the bottom part of your Thread panel.
Click the System tab.
Look for the App Consent in the drop down menu and click it.
- For first time Thread users, you will see Approve button right next to the icons of the Apps that needs consent.
(it shows Reapprove only if it requires to be reapproved for existing users)
- Once all the buttons shows Approved, it's now time to click on the next button "Verify". If all the buttons have checkmarks right beside it,
this completes the process of allowing App Consent.
This will bring you to a page where you can start typing your licensed email address (ie: info@) in the Dedicated Email field.
Click verify and save afterwards.
Adding Users
Once the above steps have been completed, you can add new users to your Thread account. New users must already exist on your company’s database, have a Microsoft 365 account, and have an appropriate Microsoft 365 license.
- To do this, click on Team Management tab.
- Choose Users in the drop down option then look for the "Import New User button" at the top left part of the page and add the necessary user for Thread.
- The Import a User from Office 365 tab will appear. Fill in all necessary details.
- Now start typing the name of the user that needs to be added to Thread.
(If more than one user appears after searching, select the rightful user you want to add.) - Click Save to add the new user.
To test that setting up the email functionality has worked:
Send an email to an individual who has been added to Thread, follow the below email content.
Subject : Thread test - Please ignore
Body of the email : This Thread Request ID is used to track application communication
The email should appear in the Unassigned Emails tab of Thread if sent successfully.
Deploying Thread Office Addin Apps from the Microsoft 365 Admin Centre
6. Who to Deploy To
A) Decide if you are going to do a test deployment or not (For these addins it is generally unnecessary)
B) Decide who you are going to deploy this to.
C) Once you have made your selections Click Next

Click Done to finish the installation.
Final Notes
Checking Sharepoint storage size and limits
Go to Active sites in the SharePoint admin center, and sign in with a MS Global Admin account.
In the upper right of the page, see the amount of storage available and the total storage for your subscription. (If an organization has configured Multi-Geo in Microsoft 365, you can point to the bar to see the amount of storage used in the current geo location and all other geo locations.)

Go to Settings in the SharePoint admin center, and select Site storage limits.
If the site storage limits is set to Automatic, there's nothing else to do.
If the site storage limits is set to Manual, in the left column menu, select Active sites, and click Thread Legal site.
On the General tab, under Storage limit, select Edit to open the edit storage limit panel.
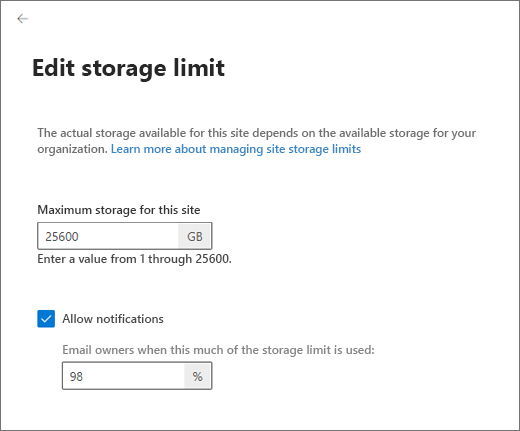
Enter the maximum storage 500GB for the site.
Make sure Notifications is turned on to send an email to site admins when the site approaches the storage limit. Then, enter a value as a percent for how full you want the storage to be when the email is sent.
Select Save.
Change regional settings for a site
As a site owner, sign in to your SharePoint site.
Select Settings
 , then select Site Settings.
(Depending on your SharePoint version, if you don't see Site settings, select Site information and then select View all site settings. Also, some pages might require you to select Site contents, and then Site settings.)
On the Site Settings page, in the Site Administration section, select Regional Settings.

Update the regional settings and select OK.

Troubleshooting
Related Articles
Accessing Thread Legal
Getting logged into Thread Legal 1. Go directly to https://app.thread.legal/ or go to our website https://www.threadsoftware.com/ and click Login in the top right corner: 2. You will be prompted to enter your MS365 credentials (or Pick an account ...Thread Assist
Thread Assist is available 24/7 on your Thread for quick guidance while you work. It has a wealth of knowledge at the click of a button and is your main go-to for any queries on how to use Thread functionalities. Whatever you need help with, Thread ...Installing Thread Add-ins
Thread offers two add-ins for users: Word Template Designer and Outlook add-in. With the Template Designer, users can create templates and pull client information from Thread, creating client forms and letters with ease. Our Outlook add-in allows ...Thread for Email Installation Failed
Getting this error when installing Thread for email using the link ( https://appsource.microsoft.com/en-eu/product/office/WA200004673?tab=Overview ) Open Outlook on the web ( https://outlook.office.com/ ) and go to "Get Add-Ins" tab as highlighted ...Navigating the Thread for Email Outlook add-in
The Thread for Email Outlook add-in helps users link their emails and attachments to Thread matters directly within Outlook to make it easier to manage and organize email correspondence and documents. In Thread, click on My Mail tab, or open the ...