Microsoft Bookings with me
'Bookings with me' page
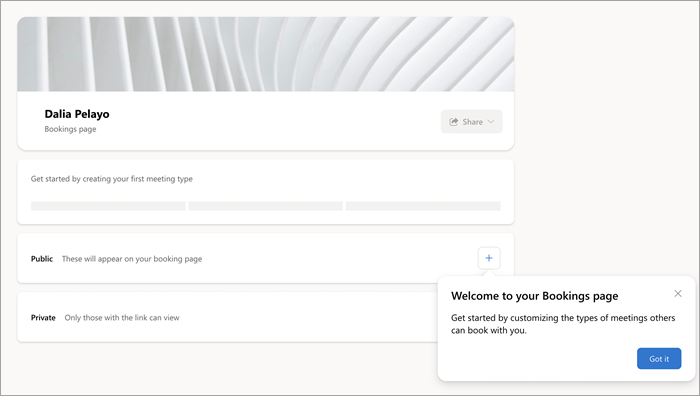
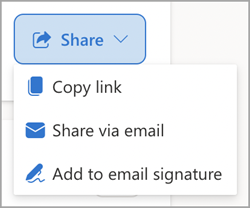
- Bookings with me: setup page A personal booking page only you can see, where you can create meeting types that others can book with you. You can access this page through Outlook on the web. After you set up your page and added meeting types, you can share it with others. For example, you can add it to your Outlook signature (see Share your page below).
- Attendee view When you share your Bookings with me page link with others, they will see the attendee view. Anyone that has your Bookings with me page link can view and schedule all your public meeting types. You are in control of who you share that link with.
- You can choose instead to only share private meeting link which can only be viewed by people who have the link for that meeting type. When accessing the scheduling view for a private meeting, only that meeting type will be visible. The difference between public meetings and private meetings is private meetings can have different links and the links expire after 90 days. You can also set private links to expire after a one-time booking. See below for more details on meeting types.
Create 'Bookings with me' page
- Open Calendar in your Outlook on the web.
- Select the Create booking page link that appears in your calendar to create Bookings with me.

Meeting Types
Custom meeting types give you the ability to customize when you want to meet and how that meeting type is shared with others. You control whether each meeting type is public to your scheduling page or is private and can only be accessed by a select group of people.
Create a Meeting Type
Create a Meeting Type from your Calendar
- Open Calendar in your Outlook on the web.
- Click the New event dropdown and select Bookable time to create a Meeting type.
Create a Meeting Type from your Booking with me page

Category Same as Outlook categories. Visible only to you.
Description Purpose of meeting, etc.
Location Physical or online (e.g., Teams).
Duration Default is 30 minutes.
Public (anyone with page link can see) or Private (access only via meeting link).
Meeting hours. Use regular hours per your Outlook or specify custom availability.
Buffer before mtg. Ensures a
stated duration remains unbooked prior to meeting start.
Buffer time after. Specified amount of post-meeting time remains unbooked for you.
Limit start time to. Sets interval of suggested start times (independent of meeting duration).
Minimum lead time. Booking must be done at least this far in advance of meeting time.
Share your page

Add my bookings link to Thread email signature
Troubleshooting
FAQ
Related Articles
Thread For Email Outlook Add In
Thread Outlook Office Add-in is a web based add-in that can be instantly deployed by your Microsoft Global Administrator to all users within the company. There is no installation required on user devices. Any updates will be instantly applied. It is ...Cheat Sheet - Outlook
Microsoft Outlook Cheat Sheet Turn Your Mail into Conversations Organise your mail into chats by turning them into conversations. Go to the View tab on Outlook and click the Show as conversations button. De-Clutter Your Mail Tidy up your ...How Do I Change a User's Details when their Microsoft 365 Details have Changed?
To change a user’s details, the user must: 1. Click their username in the top right corner. 2. Click Info. 3. Click ‘Sync from Office 365’, under Account. The user’s details will automatically sync to Thread. However, their initials must be ...Deploying the new Outlook Office Add-in - IT providers
To deploy Office Add-in you must have Global Administrator Role Permissions or equivalent. Step 1. Login Login to the Office 365 Admin Centre - https://admin.microsoft.com/ Step 2. Admin Page Click on the Settings Option in the Left Menu Step 3. Apps ...How to include a Microsoft Form link in Thread email template?
You can use Microsoft Forms to create and share forms with your clients whenever you need to collect any information for the file you are starting or working on. You can check short video guides on how to create a form and share the form to collect ...