Using DocuSign Integration with Thread Matters
Using DocuSign Integration with Thread Matters

Ensure the steps for setting up the DocuSign Integration and the Sign in Process have been completed before following the steps below.
DocuSign Menu items in Thread
The DocuSign menu items are only visible in the File Activities page of the Matters. There are two menu areas - the first is the right click menu and the second is under the New menu at the top of the Activities page.
Right Click Menu
Right click on a document to view the DocuSign Menu
You will see a number of options available under the heading of DocuSign (Note if you do not see DocuSign here please revert back to the document at the top for setting up DocuSign integration)
1. New Signing - This will allow you to send this document to DocuSign to get it signed. Once you select this option you will be asked to choose the recipients you wish to send the document to
(Recipients can only be contacts that are linked to the current matter)
2. Signing Information - When you submit the document for signing you are able to review the status of the signing by selecting this option, this will query DocuSign directly and get all relevant information about the status of the signing.
3. New Template - This will copy the current document up to DocuSign to allow you to use it as a template, you will need to edit the document in DocuSign and allocate all the relevant fields to it.
New Menu
1. Select the New menu down arrow at the top of Activities
2.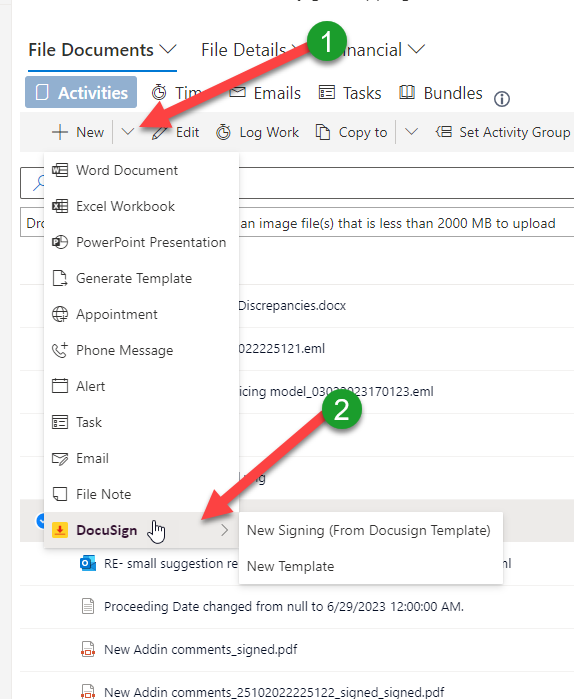
3. Click on the DocuSign menu at the bottom or hover over it
4. You will now see two options
5. New Signing (From DocuSign Template) - This will allow you to select a template from the list of templates that you have stored in your DocuSign and also the recipients, you will then be brought to the DocuSign page to complete the envelope and allow you to click Send.
6. New Template - This allows you to create a template from any document in the matter similar to the right click option mentioned above.
Send a document for Signing
- Right click on the document you want to send from the list of documents in the activities
- Click the New Signing option
- Choose the contacts you wish to send the document to. (Contacts must be linked to the Matter to be visible in this window)
- Click OK at the bottom
- You will now see a notification telling you that the system is preparing the document - As Thread stores all documents in the clients SharePoint we must fetch the document first and then upload it to DocuSign, depending on the size of the document this can take a minute or two.
- Once this completes you will you be presented with the standard DocuSign page however a number of areas should be already filled in.
- The document will attached
- The recipients will match the ones you selected from Thread (Note you can select multiple contacts when sending documents for signature)
- You are required to fill in the Email Subject and Body at this point.
- If you are using a template you can now just click SEND - however if you are not using a template then click NEXT to define where the contact must sign.
- We can now define the fields we want on the document - on the sample below we have simply dragged the signature field from the left menu down to the bottom of the document.
- Once we are happy we can click the SEND button.
- The DocuSign page will close and you will be returned to Thread.
All normal notification from DocuSign will be received as usual, if you wish to stop these you can do inside of your DocuSign account.
When the recipient signs the Document
At this point we are waiting for the recipient to sign the document - however you notice a new icon on Thread
The document now has a Yellow page icon beside it - this icon indicates that a Signing action is currently pending (waiting on recipients) If you see a green icon here it means a signing action has been completed. A red icon means a signing action has failed or there is a problem.
If you right click on the document and click the Signing Information you will see a window similar to below.
Here you can see a number of items.
1. Who sent the document for signing
2. Who did they send it to?
3. What is the current status of the signing.
Once the document is signed by the recipients you will receive a notification (1.) in Thread telling you that the document has been signed successfully, this will appear no matter where in Thread you are at the time.
When you open the file
(2.) The document will be visible in the activities list - the documents are named "document name" + _Signed.pdf
(3.) The icon beside the original document has now turned Green indicating a successful signing.
What if I make a mistake or there is an error
If you have sent a document for signing and there is an error e.g incorrect email address or wrong person you can delete the signing envelope and start again.
1. Right click on the document
2. Click the Signing Information option.
3. At the bottom of the page you will see a delete option - press delete and this will clear the signing process from DocuSign and allow you to start again.
Sending multiple documents for signature
If you need to send multiple documents from a file for signature at the same time, simply select all the needed documents in a file, then right click on any of the selected to choose New Signing.
Proceed with same steps as above.
Creating a New Template
As mentioned above, you can create a new DocuSign template using any document in the file. Templates can then be used when sending documents for signatures so you don't need to add DocuSign fields each time. Templates can be useful for documents which are always the same, such as Terms and Conditions.
 Note: The following steps do not send the document for signature, it only creates a DocuSign template.
From right click menu
Select one or more documents in the file, and right click on any to choose New Template.
All selected documents will be listed under Documents, and you can add more from the file there if needed by just typing the document name next to the list of documents, and selecting it from the list.
Type the name of this template, and choose signers if relevant (you can select any Thread contact as a signer)
You can also leave the Signers blank, which will give you the pop-up to confirm.
Once ready, click Create and your template will open in DocuSign where you can further add signature fields to the template as needed.
For more details on how to proceed with template fields in DocuSign, please contact your DocuSign support directly.
From the New menu
Choose DocuSign - New Template
Start typing the name of documents from the file you wish to include in a template, and select them.
Type the name of this template, and choose signers if relevant (you can select any Thread contact as a signer)
You can also leave the Signers blank, which will give you the pop-up to confirm.
Once ready, click Create and your template will open in DocuSign where you can further add signature fields to the template as needed.
For more details on how to proceed with template fields in DocuSign, please contact your DocuSign support directly.
New Signing from DocuSign Template
You can send a signature request from a file using a DocuSign template, without having this document in the file yet. You will be able to select any template you currently have saved in DocuSign, and when you have received a signature, the signed document will automatically upload to this file.
1. On the New menu, choose DocuSign - New Signing from DocuSign Template
2. Type to select the DocuSign template you wish to use
3. Type to select the Thread contacts you need to request signature from
4. Click Create, and your envelope will open in DocuSign where you can add any further details as needed, and then Send document for signature.
Related Articles
How to setup DocuSign Integration
How to setup DocuSign Integration To use DocuSign with Thread the company must have a subscription with DocuSign already in place. You must be a Thread Administrator to activate integrations in Thread - once activated the integration will be ...Accounting Software Integration
With Thread, you can easily integrate accounting software such as QuickBooks, Klyant, Quill, or Xero. Thread syncs data with your accounting software such as file details, contact details and bills (see more details below depending on accounting ...NCF Billing Integration
In accordance with The Dominican Tax Authorities' (“DGII”) provisions concerning the issuance and use of Tax Fiscal Receipts (NCFs), Thread provides the integration of NCF serial numbers to ensure your compliance. Learn below how to enter the ...How To export an Archived Matters Report
Viewing and Exporting Archived Matters Report 1. Click Reports on the left side pane of Thread. 2. Click Management Reports from the drop-down menu. 3. On the Managements Reports page, Select Archived matters and set preferred From/To Date filters: ...Cheat Sheets - Account Integration
Thread Legal Cheat Sheet Account Integration Klyant / Quill / Quickbooks / Xero Sync Thread information including bills and contacts to your accounting software account easily. In Admin Settings, click Integrations and toggle the relevant account ...